 The appropriate environmental arrangement for calibration laboratory is very important factor to obtain the ultimate benefits from calibrating. First of all, it is to be clear on the overall scopes and objectives of the calibration needed. Then, it is necessary to compile a list of all items of measurement tools that are needed – if they are micrometer caliper, vernier caliper, height gauge and dial gauge, for instance.
Next, the actual precision and its range of measurement are taken into consideration whether it is 1 µm or 10 µm or 50 µm, etc. It then has to find out the test tolerance allowance of each tool in order to set up the reference. These compiling information very much associates with the environmental condition arrangement in a calibrating lab.For example, if there are two operational staff in the lab, the room size should be 4 x 3 meter which controlled temperatures should be within a range of 18°C to 28°C or let’s say 23±5°C and relative humidity range is 45 to 75%RH, or 60±15%RH.
The next factor is flooring. Generally the vinyl tile flooring is suitable enough because it is an economy and easy for maintenance. As for the vibration, an easy experiment may be conducted by placing various calibrating tools around the room and notice if there is any difference on scales or not. The indifference shown means that the vibration doesn’t affect the measuring.
As for the doors, if possible, a recommendation is the sliding doors or the air-locked double doors for the best. As for the lights, conventional fluorescence lighting with enough brightness to watch the works is fine. When it comes to the walls, nowadays the choice mostly goes for gypsum-fiber insulating board. Use the same type of board that’s used for ceilings covering in the department stores.
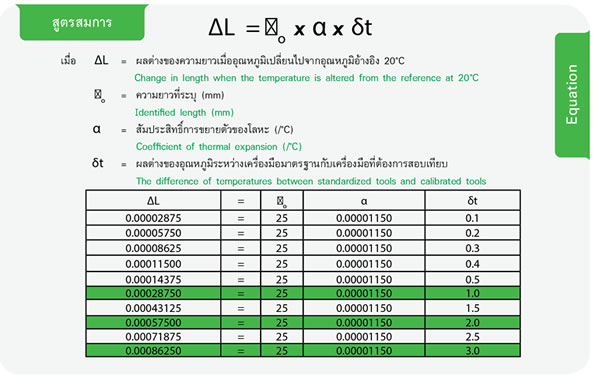
The room’s temperature is another issue that has to consider; inverter type air-condition recommended, so choose a proper one from abundant brands out there. As far as the temperature concerns, we can determine the difference of the tool lengths derived from 1°C change by calculating the equations as demonstrated below. However, it has to bear in mind that the difference of lengths that might occur must not create any error or affect the tolerance. Here is the equation. The table demonstrates the change in length (ΔL) of a stainless steel workpiece having length of 25 mm, coefficient thermal expansion of 11.5 × 10⁻⁶/°C, at different temperature range given from 0.1°C to 3°C. Based on the equations calculating, along the 3°C change, the total length the workpiece appears changing by 0.9 µm only and such little change definitely will not impact on the measuring reading results. Then you bring the calculated value to compare with the tolerance allowance to figure out the proper room temperature range, for example- if the length tolerance is 0.001 mm, the temperature range should be ± 1°C and if the tolerance is 0.01 mm, then the room temperature should be ± 3°C.

Anusorn Tonmueanwai Chief of Laboratory, Acting Chief – Dimensional Metrology section National Institute of Metrology, Ministry of Science and Technology, Thailand With over 20 years of professional experience in metrology and an invited lecturer at the Faculty of Engineering, King Mongkut’s University of Technology Thonburi

